Saturday, July 25, 2009

Metalic 3D Star

Just look at what my daughter did with the mini 3D star. Isn't it beautiful? She made this adorable book for her cousin's bridal shower and she was using the white stars I made for the tutorial the other day and I said that the white stars would not go with her book, as her book was too elegant. I then went out to teach a class and when I came back she had used some specialty paper to create these gems.
Here is a close up of one of the stars. It is done the same way as in the tutorial ( found here) but she used this great paper and wow!

Thanks,


Wednesday, July 22, 2009

SCS238

I received the Splitcoast card layout challenge today and decide I would make a card for a change. This is what I came up with. I used Pocket Silhouettes for the oval centers and not sure where the sentiment is from. I regret doing the paper piercing but it is too late now so I worked with it anyways.

The whisper white ovals are on dimensionals as are the Basic black scallop ovals. I did not have any Baja Ribbon so I used bashful blue because it was the closest color I did have. I should have got some ribbon cause I stocked up on the paper since it was one of my favorites.

I scallop border punched the top edge of the white border and then eyelet border punched the lower edge on the same piece. The Designer Paper is from Walk in The Park, and the card base is Baja . The final touch is two silver brads on either side of the sentiment.
Thanks,


3D Punched Star mini tutorial and Card

I was playing with my punches the other day and discovered a really neat thing I could do with the star punch. By adding a few score lines and creasing them, accordion style, I could create a sort of 3D star. It is so easy I want to share it with you.

First you will need a star. This can die punched or die cut, or perhaps even roughly done with just scissors, although I did not test that way.
I am using Stampin Up's large star punch for the tutorial.

I cut out two stars so you can see the dimension that gets added from a simple flat image.


Here are the two stars. I only will be working with one.


Using your Scor Pal or any other method of choice for scoring. Score from each point to the opposite side of the star, which should be a valley.

Repeat this same step for all five points on your star. It should then look similar to the image below.


Now Pinching on the point, create mountain folds for each point, and this will make it easier to then pinch from underneath all the valley folds (the short score line between each point).


Your star is now finished and is somewhat 3D. If you wish to stamp your star with a design you should do so before you start the scoring process. The star I used on my card was first stamped with a small leave branch stamp.


This is so easy you can whip up a whole bunch in no time. They make, great stars, obviously, but also would work for starfish on a beach layout or card. I have so many uses for this sweet star already, but would love to see what you can come up with as well.

Another view of the card showing better how dimensional the star is. I used dimensionals under the center of the star to attach it to a flat star underneath and then attached it to my card with more dimensionals.

Thanks,


Thursday, July 16, 2009

Christmas Sneak Peek!

Okay I know Christmas is not here yet, but I have been seeing some Christmas in July projects and, although this sneak peek will not be shown again until the fall, I could not wait to show you. There WILL be a tutorial. I hope you enjoy it and would love to know what you think. I had such fun making this. I have other Christmas projects in the works as well.....maybe Christmas could come early this year.


Thanks as always,

Wednesday, July 15, 2009

New Twist on an Old Favorite

Have you ever tried a Star Book? Well, I have wanted to for some time, but with all the ideas I have in my head for projects and all the fun ideas out there to learn, I have put if off until now.

Mine is slightly different than the traditional method. Mine is coil bound with my Bind It All. I wasn't sure it would work...but it did. I will be posting the tutorial for this Coil Bound Star Book soon. I think I will call it Bound by the Stars. I used a Spellbinder Nestability but you can easily adapt this project to any size. I also used the new Razzleberry Lemonade DS paper.

Here is the book open so you can see that it still opens similar to the traditional star book.

And one more view. The rest of the images will have to wait until the tutorial.
Thanks for looking,


Monday, July 6, 2009

New Winner for Blog-a-versary

Well, I still had no response from my first drawing for my Blog-a-versary. So I did a new draw today.
The new winner is ....number 3.


That means Chrissy you are the new winner.

Chrissy said... Happy Blog-a-versary!!! Thanks for the chance to win and I'm now following your blog and will post a link on mine!


Please contact me with your e-mail addy so I can get your first tutorial to you. If you have already purchased this tutorial I will do a refund through Paypal.

Thanks,


Butt Card!

A few years ago, my sister took this picture of my butt. I am not gonna make any comments on the picture. We all know how we feel about our own butts. However, on Splitcoast they recently had a challenge to make a card using faux jeans as a technique. So......this picture became the inspiration for my card.
Can you see the resemblance? lol. For the belt I used a piece of Close to cocoa cardstock and I used versa mark to cover the whole piece and then covered with clear embossing powder. I then, using my bone folder, drew random squiggly lines over. I used my heat gun to set the powder. I then tried to sponge the edges to add depth but realized this should have been done BEFORE I used my versa mark ink. Oh well, live and learn. The rest is paper piecing. The base of the card is one piece but you can only see it as the part just under the belt, all other pieces are add ons. The belt loops are added on. I used my Just Jeans background stamp on all the pieces to give the texture of jeans. I used Brocade Blue for ink and paper and marker for the stitches. Each buttock is a separate piece as is each pocket , which is adhered so you could stick something in the pocket if you wanted to. There is a small tag that says "friend". I use faux stitching to make all the stitches, piercing two rows of holes around the edges where seams would be. Then using my marker joined the holes to makes the stitches. I used sponging and my marker to add depth and shadow on the card. I know it is not an exact replica, but that's my story.
Thanks,


Sunday, July 5, 2009

Fifth Avenue Bookmark

My daughter, the one who designed the Rustic Star, made this beautiful bookmark the other day. She does lovely work. She made a few other things to, that she said I could post. I will save them for another day.

Here you can see how she added some dimension to her project by shaping the flowers, so they pop off the page a bit. They all, also swivel as they are only attached with the center brad.

I have yet to have my Blog-a-versary winner contact me so I will give her until tonight. If I do not hear from her by then I will do another drawing for a winner Monday morning.

Thanks,


Thursday, July 2, 2009

Double Pocket Card Tutorial-My Version!

Some time ago I made a double pocket card similar to the one found here. Mine however is square and opens like a tradition card to reveal the inside where the two pockets are. I have recently had a request for a tutorial on how I made my Double Pocket card.
So, because I like to keep my viewers happy, here is a tutorial. There are lots of pictures and hopefully it is easy to follow. I have used the new Razzleberry Lemonade DS paper with coordination cardstock from the new InColor papers. Some stamp sets are retired. I rarely get rid of any stamps.


Begin with a square piece of paper. Mine is eight and a half inches square. Score at four and a quarter.


Then turn paper 90 degrees and score at four and a quarter again. If your paper is a different size than mine you will be scoring in both directions at the halfway point.


Then fold your paper at score lines. Both ways and burnish with your bone folder for a crisp fold.


Then on ONE line cut from outside edge to center where score line intersect. Do not cut the whole way across or you will now end up with two pieces of paper.


Your paper should now look similar to this. Mine is a bit jagged because I need a new cutting blade.


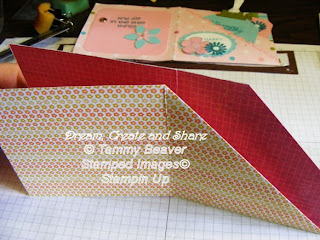
with wrong side up and cut to your left. On the bottom right quadrant fold the outside corner to the inside corner and crease edge.


Fold edge closest to you up and over top half. Cut edge should be on the left side and folded edge on the right side and, once folded to the inside of card.

Your card should look similar to this ...

Now on the upper right corner of the back part of the card( the pink section on my card) Measure one and a half inches in from the previous fold on the top and on the side. I have made small ink arrows on my grid paper for you to see where I mean. Then make a score line joining these two points. I did not make any ink point on my card only on the grid paper behind my card.

A better view of the score line...

Fold this edge at the score line to the back and burnish with a bone folder for a crisp edge.


Now lift your card and you will be taking the left back section and folding it to the right so it is behind the section you just folded.

I hope this is easy to understand, folding can be difficult to show without video.

Your right side should now look like the picture below.

To keep this from opening back up and also to create the actual pockets, you will need to add adhesive, so open the back part and flip this over so your card looks like below.


Apply thin adhesive to the areas shown in the picture below. This will make your back pocket on your card. Remove adhesive backing and fold over and secure.


Now open the first flap your made and apply adhesive where I am showing a blue strip.(I forgot to take the picture of this step with the adhesive here-ooops!) Then remove adhesive backing and fold flap back into place.

On the top of the flap, apply another strip of adhesive, the black strip in this picture. Then fold (from picture below)part closest to you upwards over top part of card and secure. This will create the other pocket.


Your card should now look like a square as below.


Your card should now look like so and is not ready to decorate as desired.

Here is how I trimmed mine.

And here are my two tags.

and the tags inside the card.

And of course the card front.


Thanks, and I hope this was easy to understand.