
Some time ago I made a double pocket card similar to the one found here. Mine however is square and opens like a tradition card to reveal the inside where the two pockets are. I have recently had a request for a tutorial on how I made my Double Pocket card.
So, because I like to keep my viewers happy, here is a tutorial. There are lots of pictures and hopefully it is easy to follow. I have used the new Razzleberry Lemonade DS paper with coordination cardstock from the new InColor papers. Some stamp sets are retired. I rarely get rid of any stamps.
So, because I like to keep my viewers happy, here is a tutorial. There are lots of pictures and hopefully it is easy to follow. I have used the new Razzleberry Lemonade DS paper with coordination cardstock from the new InColor papers. Some stamp sets are retired. I rarely get rid of any stamps.
Begin with a square piece of paper. Mine is eight and a half inches square. Score at four and a quarter.
 Then turn paper 90 degrees and score at four and a quarter again. If your paper is a different size than mine you will be scoring in both directions at the halfway point.
 Then fold your paper at score lines. Both ways and burnish with your bone folder for a crisp fold.


Then on ONE line cut from outside edge to center where score line intersect. Do not cut the whole way across or you will now end up with two pieces of paper.
 Your paper should now look similar to this. Mine is a bit jagged because I need a new cutting blade.
 with wrong side up and cut to your left. On the bottom right quadrant fold the outside corner to the inside corner and crease edge.
 Fold edge closest to you up and over top half. Cut edge should be on the left side and folded edge on the right side and, once folded to the inside of card.
 Your card should look similar to this ...
 Now on the upper right corner of the back part of the card( the pink section on my card) Measure one and a half inches in from the previous fold on the top and on the side. I have made small ink arrows on my grid paper for you to see where I mean. Then make a score line joining these two points. I did not make any ink point on my card only on the grid paper behind my card.
 A better view of the score line...
 Fold this edge at the score line to the back and burnish with a bone folder for a crisp edge.
 Now lift your card and you will be taking the left back section and folding it to the right so it is behind the section you just folded.
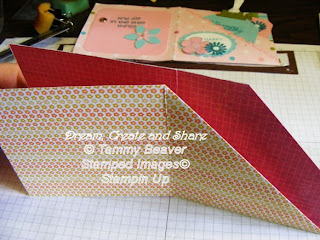 I hope this is easy to understand, folding can be difficult to show without video.
 Your right side should now look like the picture below.
 To keep this from opening back up and also to create the actual pockets, you will need to add adhesive, so open the back part and flip this over so your card looks like below.

Apply thin adhesive to the areas shown in the picture below. This will make your back pocket on your card. Remove adhesive backing and fold over and secure.

 Now open the first flap your made and apply adhesive where I am showing a blue strip.(I forgot to take the picture of this step with the adhesive here-ooops!) Then remove adhesive backing and fold flap back into place.
 On the top of the flap, apply another strip of adhesive, the black strip in this picture. Then fold (from picture below)part closest to you upwards over top part of card and secure. This will create the other pocket.

 Score at four and a quarter.
 Then turn paper 90 degrees and score at four and a quarter again. If your paper is a different size than mine you will be scoring in both directions at the halfway point.
 Then fold your paper at score lines. Both ways and burnish with your bone folder for a crisp fold.

Then on ONE line cut from outside edge to center where score line intersect. Do not cut the whole way across or you will now end up with two pieces of paper.
 Your paper should now look similar to this. Mine is a bit jagged because I need a new cutting blade.
 with wrong side up and cut to your left. On the bottom right quadrant fold the outside corner to the inside corner and crease edge.
 Fold edge closest to you up and over top half. Cut edge should be on the left side and folded edge on the right side and, once folded to the inside of card.
 Your card should look similar to this ...
 Now on the upper right corner of the back part of the card( the pink section on my card) Measure one and a half inches in from the previous fold on the top and on the side. I have made small ink arrows on my grid paper for you to see where I mean. Then make a score line joining these two points. I did not make any ink point on my card only on the grid paper behind my card.
 A better view of the score line...
 Fold this edge at the score line to the back and burnish with a bone folder for a crisp edge.
 Now lift your card and you will be taking the left back section and folding it to the right so it is behind the section you just folded.
 I hope this is easy to understand, folding can be difficult to show without video.
 Your right side should now look like the picture below.
 To keep this from opening back up and also to create the actual pockets, you will need to add adhesive, so open the back part and flip this over so your card looks like below.
Apply thin adhesive to the areas shown in the picture below. This will make your back pocket on your card. Remove adhesive backing and fold over and secure.
 Now open the first flap your made and apply adhesive where I am showing a blue strip.(I forgot to take the picture of this step with the adhesive here-ooops!) Then remove adhesive backing and fold flap back into place.
 On the top of the flap, apply another strip of adhesive, the black strip in this picture. Then fold (from picture below)part closest to you upwards over top part of card and secure. This will create the other pocket.
Your card should now look like a square as below.

Your card should now look like so and is not ready to decorate as desired.
 Here is how I trimmed mine.
 And here are my two tags.
 and the tags inside the card.
 And of course the card front.

Thanks, and I hope this was easy to understand.


Your card should now look like so and is not ready to decorate as desired.
 Here is how I trimmed mine.
 And here are my two tags.
 and the tags inside the card.
 And of course the card front.
Thanks, and I hope this was easy to understand.

1 comment:
Simply amazing! I have enjoyed making the double pocket card, but now I can't wait to try your version! I love that it has a front panel! Thanks so much for the tutorial! Your work is always inspiring! Blessings to you!
Post a Comment