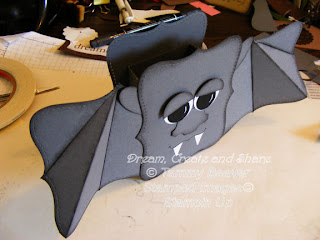
 Here is the next of the character boxes. Isn't he just adorable? I love how he turned out.
 To make his wings I cut a copy paper Top Note die cut and then drew the following lines as shown in the image above.
 Cut the first section off, as it is not needed.
 Then score the three remaining lines and accordion fold them. This is your wing template.
 I cut 3/4 of the large oval punch for the ears.
 Here are the items you will need to make this cute bat box. Two Top Note die cuts from a gray card stock, and then a box made as shown in the Frankie tutorial. Two wings made as shown above, a nose and eyes as also shown in the Frankie tutorial, a mouth template made from half a curly label punch and teeth as shown in Dracula's tutorial.
 Attach nose to center of face.
 Then attach eyes as shown in Frankie tutorial.
 Create Batty's mouth as in the Dracula tutorial.
 Attach ears as shown above.
 Then attach wings behind the ears. Add wire as in the Frankie tutorial and Batty is finished!
 This is the same box, but the lighting in the room I took the picture must have been different as now the box looks slightly purple. Hmmmmm.


8 comments:
too clever
WOW! I am so amazed with your talent! Thank you so much for sharing!
Tammy!!!!!!! You are amazing!! I think these are the Best/Quality Top Note Boxes I have seen out there in www Land!!!
Kudos to you!! I Bow to you!!!
Very well done!!
Tracy Altemose
Oh WOW oh WOW oh WOW
love it!
You are GOOD!!!!!
Oh my gosh, you ARE good! Thanks so much for sharing.
This is a very clever idea for the wings. Thanks for sharing.
Monika Davis
my blog: monikastamp.wordpress.com
This is so neat! What a great idea and thanks for showing us how to make it!
another awesome new way to use the top note die!
Kim
http://www.paperpunchaddiction.blogspot.com
Post a Comment