Showing posts with label boxes. Show all posts

Thursday, October 3, 2013

Paper Pumpkins-Totally Cased


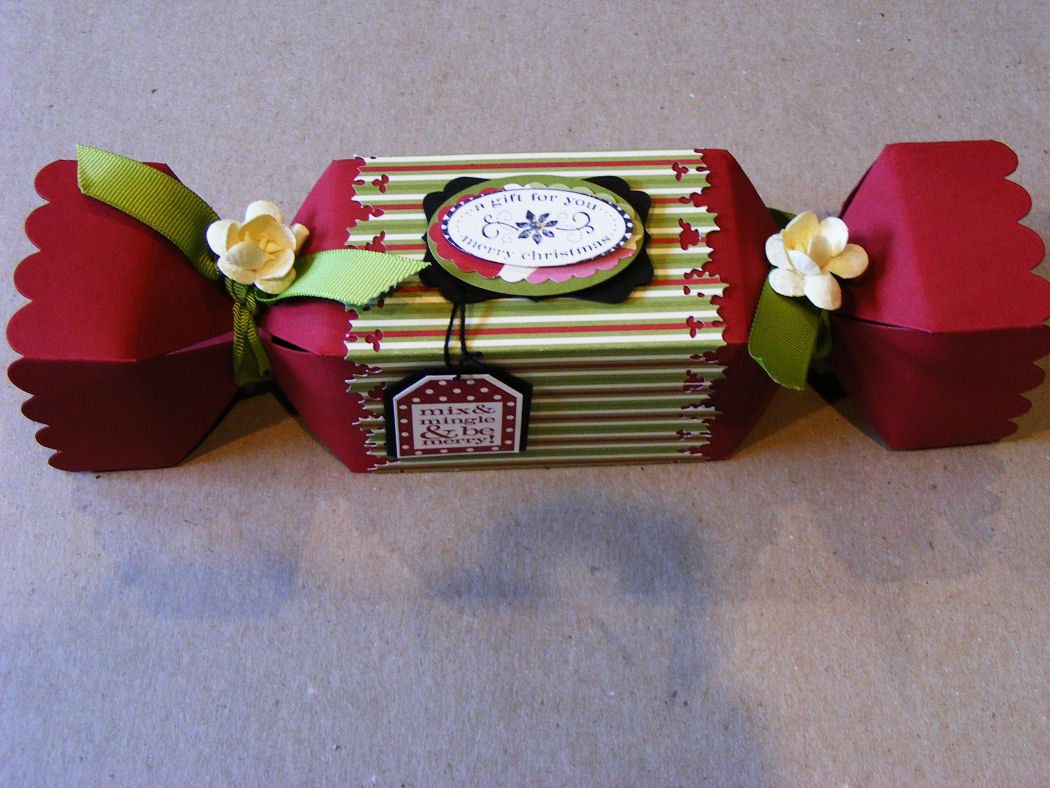
After seeing these made in a post on the Graphics 45 Blog, I just had to try one of my own. Well, one turned into four. They are so quick and easy and look so adorable.


You can check out the post here


there is a video tutorial for several halloween pumpkins. I have started the book one and hope to finish it today.


My neice came over the next day and wanted to make one as well, so fun.


hope you enjoyed this post and maybe give these a try...you can vary the size but changing the length of the paper. I used 5",6", 7"


Thanks,

Friday, January 6, 2012

And More Boxes!

Favor boxes are so fun to make...here is a sampling of the boxes I have available. Most are embellished for weddings but they can be used for birthdays, anniversaries, shower, basically any celebration. Create labels with the couples name and or date, use as placesetting markers with guests names on them, or just a fun way to give a small treat.


This box is made using the same die as the box below, just one less side. I embossed the center section to add interest.


This is called box-candy. I used a border punch on the edges.


Thanks,


Thursday, January 5, 2012

New Favor Boxes Available!

I bought several new favor box dies from Accucut. These are great for Weddings, birthdays, anniversaries, etc.
The one pictured above is a self closing box. I used designer paper to create it and stamped the tag with a similar designed stamp. It looks like it is from the paper but it isn't. These are very fast to put together and require no adhesive.


This one is a cake slice box. it is the largest of the boxes. I added some border punched trim to the upper edge to look like icing. and then wrapped the box with some satin ribbon and added a elegant bow. Simple yet beautiful!


This is a mini french fry box. The box itself is quite plain, but I love how it turned out. I used Designer paper for the box and added some satin ribbon. The label is on dimensionals and of course a bit or floral embelishments add a finbal touch to this favor box. This ended up being my favorite in the end.


This last box is called a Bon Bon box. It is simple but adorable. This was my favorite until I did the mini french fry box. Okay lets face it, they are all just adorable.

So, if you are in need of favor boxes, check out my store at http://dcands.ca. Prices aren't posted yet but contact me and we can get pricing worked out.
P.S. Large orders will require longer pre -order times.


Thanks,


Friday, December 30, 2011

Advent Calendar Wreath

I got a new Accucut die called Box-Bon Bon. Shortly after it arrived Accucut posted a contest and Amanda suggested i use it to make something for the contest. It is a pinnovation die and there aren't many videos in that section yet. But I never used it that way. I created 25 boxes and turned them into a wreath that is used as an advent calendar. I used Graphics 45 Christmas paper and feel it turned out awesome!
Graphics 45 thought so too and it won a Randon Crafts of Christmas prize from them. I haven't received the prize yet but will let you kow what it was when it arrives....thank you Graphics 45, I love your products.
I won't know if it has won the Accucut contest until the New Year but I will let you know if it does.
You can view the video below.


Thanks,


Tuesday, November 15, 2011

Love My Cracker Box Die

I am loving all the cute boxes I can make using this one die. It is a good size and is so versatile. Here is a Christmas Box version. They are easy to assemble and fun to embellish. The possibilities for this die are endless.

You can get these die cuts from me by going to my store at

http://dcands.ca

LoveIt! and it has been quite popular with my customers.

Thanks,


Saturday, November 12, 2011

Cracker Box Birthday

Happy Birthday Sue,
I made her this adorable cracker box. I used Chocolate Chip cardstock for the box. I die cut a mini dress form and spool from the new Tim Holtz movers and shapers. I added ribbon and designer paper and gems to the dress form to make it look like a dress. Then added some flower accents.

The sentiment is from My Favorite Things and the Happy Birthday is a Stampin Up stamp. I added faux stitching to the outside of the label, which is also a Tim Holtz die, Labels I think. The box ends are tied with some Stampin Up Baja stitched grosgrain ribbon.


I added some black crochet cotton to the die cut spool to represent thread. Added a flower and a heart shaped button as well.


I love how it turned out. I filled it with an assortment of candies. I hope she liked it....she loves to sew.


If you want to know how to make your own cracker box or buy ready cut cracker boxes check out my store here.


Thanks


Tuesday, October 11, 2011

Contest Entry

Hi Scrappers,

Here are a few pics of my contest entry. I used this project for two contests, One with I AM Roses, in which they are choosing the winner based on most "likes" I am currently in second place, so if you want to help me win , please check out the video here and clcik the LIKE button please and thank you!

I also used it for an Accucut Halloween contest entry. The box is an Accucut die called Box-Gable (3D). It is a great little box. It is about the size of my hand, so not too little.


I was able to use Tim Holtz's mini cabinet card die to make the mini for inside this box.


Here are a couple of the pages. They are small so not able to do too much with them, and needed to fit the mini back into the box.


This is a fun set of pages, the moon is actually a tag that pulls out.


Thanks,


Wednesday, October 5, 2011

Contests Entry


Hi Ladies,
I need your help. I am using this video for two contest submissions. One with Accucut, and one with I Am Roses.
The I am Roses one, I need your help for.
PLease watch my video on YouTube, double click the video to see in on YouTube, then click the little thumbs up button if you like it. They are awarding the prize to the video with the most likes.
Thanks so much for your help,

Tuesday, October 4, 2011

Sock Monkey Character Box

I had a recent request to make a sock monkey character box. So here is the result. Hope you like it. WARNING, this post is picture intensive!


I first die cut two Top Note shapes from Basic Gray Cardstock.


I then embossed with folder that gave the feel of a knitted texture. I used square lattice by Stampin Up.


I then cut a piece of cardstock measuring 4 1/4" x 8 1/2". On the portrait layout a scored in 1" from each edge.

Then I rotated my paper to the landscape layout and scored in from each side at 3 1/2".


I burnished all my score line , then cut, as shown above, on the landscape edges, the two center lines into the 1" score line.


Next add some adhesive to the inside pieces as shown in picture above, and put box together.


Add more adhesive to the one side, this will be the back of the box.


Add one of the Top Note shapes, as shown.


To make the ears, punch two circles using the 1 3/4" punch from Stampin Up, then cut a line into the center on each.


add adhesive as shown below.


ooops, almost forgot, run circles through embossing machine using same folder.


Overlap cut line to make circle so it is slightly cupped.


I then pushed in a bit on the center of each to get the above look.


add some adhesive to the side of each and attach to the back of the Top Note piece you have left.


Okay this piece was a bit tricky, I could not find a Stampin Up product to make this piece so I used a Tim Holtz die...Artful Dwellings. I die cut the rounded arch house and then flipped it around so both ends were round when I finsihed.


I then used Stampin Ups oval punch to make the lips.


adhere the artful dwelling oval and then the red oval onto the Top Note shape as shown.


This is the monkey's mouth.


I then used a marker to draw in two lines for nostrels.


Now if you have black buttons you would like to use you could use them for the eyes.


I punch two 1" circles and added white gel pen lines for the highlights. I then used my black marker to add two eyebrown lines.


To make the hat I die cut the larger triangle from the perfect pennants die.


Then for the hat brim, I diecut the long edge of the Top Note shape, both pieces are from Basic Gray Cardstock.


I took the Top Note edge pice and flipped it over and recut on the other side to get the above shape for the brim.


Then emboss the two pieces using the same embossing folder as previously used.


I chose to put my triagle piec on the long edge. and then layer the brim over it.


add some adhesive to the monkey head as shown above.


Add you hat layers as shown.


I then cut a scallop circle out and embossed it. I used Cherry Cobbler for my red>


Adhere the scallop circle to the hat tip


I chose to fold my hat down a bit as shown, before adding the red scallop circle. You could adhere or staple this.


Sock Monkey's face is done!


I then adhered it to the box front and Voila, Sock Monkey character box. Hope you like it Marie and hope the shower goes great!


Thanks,