Wednesday, June 30, 2010

Tag for Arlene's May Swap

I was looking through my blog and realized I never posted the pictures of my May tag for Arlene's Tag swap. She did a swap for June but now she is no longer doing it. I will miss it, I had fun doing them. I was going to break from it for the summer because of kids all being home, but now it is over for good.

The theme was the beach and the challenge was to make it super dimensional. The tag is die cut from the baroque die by Tim Holtz, and glimmer misted and accented with some shells using perfect pearls.

I included a pull out mini tag on the front.

The tag is stamped and embossed on both sides.

I glued on some real shells for the super dimensional fell and look.

I added texture to the background, added a layer of Glimmer misted cheesecloth to like like a fishing net. I wrapped some hemp twine around the tag. Added a charm on a fishing lure clasp. I strip of Matha Stewart lace trim with pearls.

I received my tags from the swap yesterday and posted this video. I forgot to add mine to the group for the video as I had to keep mine so it was not in the box when it arrived.

Thanks,

Thursday, June 17, 2010

Club Projects

Club night was fun, we did three cards.

This was the teachers favorite. It was a bit tricky to get the grad collar just right.

This was the teachers second favorite. It is a very elegant card and was fun to make.

This was the teachers least favorite, we did this one first, but this was my favorite cause I could distress this one and I love the look and feel of this card. Club is always fun, everyone has such a great sense of humor, I look forward to it every month. It was our last until the fall, I will miss it over the summer.
Thanks,


Friday, June 11, 2010

GRAD mini Class

This mini is designed to look like a grad hat. The center of the cover has a tassel as it very simple and only embellishment.

Here is one of the pages inside the book, here there is a circle photo/journal spot that is removable. It simply tucks in behind the pocket, which contains a mini file folder more more photo/journal opportunities.

This page has some flowers and gem flourishes to accent a photo matt.

This page uses the TopNote shape for a photo matt and has a punched accent and stamping to embellish the page.

This mini has a different binding, you will need to see it in person to fully appreciate it as I was unable to get a good photo of it. There are more pages which you will get tos ee when I get around to doing a video for this mini.
Thanks,


Tuesday, June 8, 2010

And the Winner is...

Hi Ladies,

Back again and I have resolved my internet issues and was able to get the video posted.
You can check it out below.

Thanks,

Monday, June 7, 2010

Blog A Versary winner!

Hi ladies,

I have a winner. I did a YouTube video for the draw, showing the items for the giveaway and had my son draw a name from the basket, but my laptop is giving me some tecnical issues, so until I can get a hold of my older son to help me get it figured out, you are gonna have to wait just a bit longer to see and hear who the winner is.

Thanks,


Friday, June 4, 2010

Treat Box Variations

I made a couple more boxes with some slight variations, the one above is slightly shorter but used the same flower from the die. I did not add as much embellishments to this box and I did not include a knob on the top.

This box is made using the largest flower from the flower folds die. I also made the box shorter (4"). The paper measured 4" x 7 1/4". I scored it every 7/8" .

I used a Prima flower with a handmade rosebud center for the box topper on this one.

I should have made my vine stamping a bit higher on this box as most of it ended up being covered by the lower petals, but I will know for next time. You can see the tutorial for this box here.
Thanks,


Thursday, June 3, 2010

Flower Folds Treat Container Tutorial

Are you ready for the tutorial? This box was super fun and easy to make. I used the Flower Folds die from Stampin Up. This die has four different sized flowers on it all the same flower. I used the second largest, but this idea would work for any of the flowers, measurement however would change.

First die cut two of the second largest flower from the die. I used Old Olive cardstock. Then I cut a piece of cardstock in Very Vanilla 6 1/4" x 5". The 5" measurement is for the height of the box, you can alter this to whatever height you desire. On the landscape layout I scored every 3/4" and then that left the last score so there is 1/4" left at the end for your adhesive. See Below*

I then burnished all the score lines with my bone folder.

This is now what your paper should look like.

I then stamped some images on the paper. I used some Tim Holtz vines and some butterflies.

I also like to sponge all my edges, so then I used some brown ink and an ink tool to sponge my scored edges.

Apply a strip of adhesive to the 1/4" end piece. I like to use the Sookwang tape but sticky strip is good as well.

Because there is an even amount of sections, I was able to remove the adhesive and easily line it up by folding both sides in to the center as shown an overlapping over the adhesive strip. I find it easier to get the adhesive straight when I do it this way. * I was just reading over my post and realized this would also be a good way to stamp your image to get an unbroken design around your box.

You should now have a tube that looks similar to this.
Score new fold lines slight out from the die cut score lines. So that they are from each petal to petal where they meet the center, as shown above.

burnish with your bone folder.
Sponge your edges as shown

(sorry somehow lost this picture, it was of adhesive on the inside of the petals)
Apply a fast drying adhesive to the inside of the petals only.

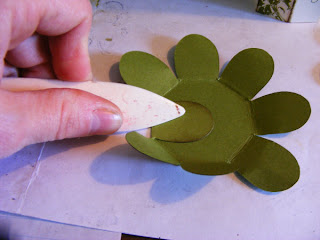
wrap the petals up over the bottom of your tube. I overlap the petals one by one so they are all overlapping in the same direction. This can take a few moments. You can then hold in place with an elastic for a few minutes.

Cut tow 7" pieces of grosgrain or other ribbon, and apply adhesive tape to one side of each, as shown.

wrap the ribbon slowly around the bottom petals. Then add top flower part without adhesive on the petals and wrap second ribbon around as before. I was able to do this without an elastic, but it is much easier if you hold the petals in place first with an elastic and then wrap ribbon around cover. No adhesive is added to top petals as this is your lid and you want to be able to remove it.

Your box should now look like this.

I added a small bow to the ribbon on the lid.

I then decided I wanted a knob on the top of the lid, so remove your lid and using a piercing tool make a small hole in the center of the lid.

I then added a Tim Holtz Hitch fastener to the hole for my knob.

Voila, you have a custom container for all sorts of goodies. I hope you enjoyed the tutorial.
Thanks,


Wednesday, June 2, 2010

Today I am adding to my Blog-a-versary blog candy ....

A Tim Holtz movers and shapers Keyhole die

So that means so far we have

Flower soft in Ivory
One package of my homemade flowers
PDF Bingo cards-all three
and now Tim Holtz Movers and shapers-Keyhole die

looks like this is going to be a great blog candy.
Thank you all to the wonderful blog-a-versary wishes and the sweet comments you have been leaving.

Thanks,

Tuesday, June 1, 2010

June P3 Challenge Submission

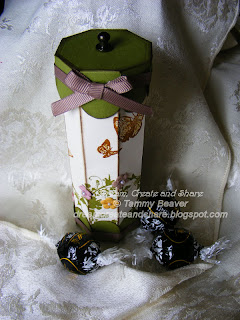
Here is my project for Paper Cubed this month. The challenge is to make a treat container. It can be any kind of treat container. I decided to make one from scratch, I prefer to come up with something new and different. I used a Sizzix die to help make this little cutie. I will be posting the tutorial for this later this week.

This box will easily hold some delicious goodies of your choice. You can vary the height of this box to whatever you want to contain inside.

To participate in this month challenge for a chance to win THIS MONTH'S PRIZE of A $15.00 GIFT CERTIFICATE TO "MY TIME MADE EASY" an online store with really cool 3D templates, go to Paper Cubed now and submit your project ASAP.
You can check out the rest of the design team projects here...
and
Thanks,