Tuesday, June 30, 2009

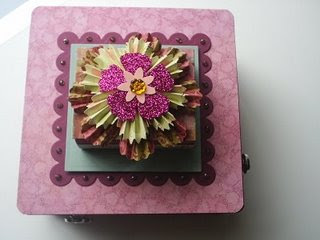
I'm Back!

Well, Being on the road in a big truck sure is a different way of life. I enjoyed being with my husband on the road, but I am sure glad to be back home.
Thanks for all the great comments posted while I was away and also thanks to those who patiently waited for their tutorials for my return home. I will be working on some requested tutorials and project for fall classes. Summer is a bit hectic with the children home from school , so I am not sure how often posts will be made during the summer, but I will when I can.
It is good to be back!
Today is also your last chance at my Blog-a-versary candy- free tutorials for a year. I will do a draw for the winner in the morning but any comment posted after midnight tonight will not be included in the draw.

Thanks,

Blog-A Versary Blog Candy

Good Morning,

It has been a great year on this Blog. I am so grateful for all of the visitors I have had, all the followers I do have, and for all the wonderful comments that have been left over the past year. To celebrate I want to offer some Blog Candy. In celebrating, I would like to increase my Blog's exposure. I have reached 25 000 hits before the year was up and to me that is incredible, but I have made a goal to hit 300 000 for my second year and I will need your help to reach it.


In the past I have a few responses to my blog candy offers and I have noticed that some blogs have hundreds of responses to blog candy offers. So, I want to get my best response ever, and I need your help to do it. In order to have a chance at this blog candy, you need to leave any response to this post, then you need to post my offering on your blog with a link back to my blog candy offer. If you are not already a follower of my blog, you need to sign up as a follower. There are currently 12 followers. If you already are a follower but do the other steps your name will be included. I must have a way to contact you (as some people who leave comments or who are followers do not have any contact info).

So are you ready to know what the Blog Candy is?

I am offering....

My newest tutorial for the Carousel Trinket Box for free ( if you already purchased it, I will give you a refund)
plus a free subscription to any other tutorials I create until my next Blog-a versary.

Sound worthwhile?
if so, let the comments begin.

Thanks,

This offer will end the last day of June 2009.

Friday, June 19, 2009

Away for a Bit

Hi,
I will be away from my computer for about a week, I am going away with my husband who is a long haul trucker, so I will not be able to send tutorial files until I get back. Sorry for any inconvenience. I will promptly send them out when I return.

Thanks,

Thursday, June 18, 2009

Look at this!

Just look at the beautiful Carousel Trinket Box that Mary from Primitive Seasons created. You can see more pictures on her blog. She used the new Designer Series paper from Stampin Up and lots of great embellishments. I love it! Great job Mary and thanks for the wonderful comments on your blog.


Thanks,


Wednesday, June 17, 2009

Peek - A - Boo!

Here is a cute card, with a surprise inside.
As you open the card ... can you see it? ... a new image seems to magically appear.

I tried to make this into a smaller size and have learned that some of the measurements are important to remain the same so this card works for any size. I will post it later as it will be a possible club project.
Thanks,


Monday, June 15, 2009

What's The View!

I have wanted to do a "Viewmaster card" ever since I first saw the tutorial on Splitcoast ages and ages ago. This is a hard card for a couple of reasons. The first is you need things in your windows that make sense with the saying or image on the front of your card. The second is dressing the card up to look nice. I think I was able to do both after many, many thoughts on this card. I found two ideas that worked. Each of them is five and a half inches square.The first is in Baja Breeze, Basic Gray, Basic Black and Whisper white. I put the "spin mechanism" on the left side for this card and had to be very careful with the position for the window as it just barely fits using the large oval punch. I know this is a bit confusing, unless you have made one of these cards. But the window is tricky if you do not want the outside edge of the bottom layer to show through. I also have more layers in my card than a typical Viewmaster card. I took pictures as I made this card in case there was interest for a tutorial on how I made my Viewmaster card. The greeting on the cards says.."YOU" "R" and then the responses are in the window. Below you can see the first saying in the window which is "wonderful"
Here is the next saying in the window...kind


and the last is ....a Best Friend


I also included a saying on the inside of the card but forgot to include the picture for this post. Sorry.
Here is my second Viewmaster card. This was has a time theme and an aged look with Chocolate chic, Kraft, Close to cocoa and very vanilla cardstock colors being used. I used various sets, many of which are retired to make this card. The Greeting says " Time Spent with Friends is..."
and the windows say..."fun"

and " time well spent"


and "special". Oh, I am not sure if you can tell from the pictures, but the clock arms also move. I think though, if I did this card over, I would buy some clock hardware and add real arms.

To make the word "Friends" stand out I put some Stickles inside the letter outlines and then let it dry.

These were sooooooooooo very fun to make. I think they should offer them as another technique challenge on Splitcoast, what do you think?
I wonder what else I can do with this technique.
Thanks,


Spreading the word


I am spreading the word about a great Blog candy offer. A chance for the new Stampin Up In Color papers, ribbons and markers.
I f this interests you check out ScrapMaster's blog.

Thanks,

Saturday, June 13, 2009

On A Hinge

I was able to get a second Splitcoast challenge done today, this one for the hinge card challenge.

Here is my first attempt at this card. But once I was finished and had taken my pictures, I decided it still needed something. So here is what the final card looks like. All I added was the butterfly from Great Friend.
This was a fun challenge and I recommend trying this one as well.

As you can see my is not a tradition card. I chose to do mine with the Scallop circle die and I altered some things so my mechanism does not show.


Here is a close up of the cover detail. I used the five petal punch and another flower punch that is not Stampin Up. I ran them through the BigShot with a Cuttlebug embossing folder. Then sponged the edges and took my large stylus over the back of each petal so it would give some shape to the flower petals. The hinge is the large corduroy brad and another small silver brad is in the smalled flower. The butterfly is sponged and has gems for the body. I then added some die cut leaves for a pretty effect.


The card opens to reveal a saying. Oh, I also included a small scallop border across the outside panel. I used Walk in the Park DS paper. I think I will be ordering some more of it before it goes out with the mini.

For the outside sentiment I used the Thank You Curly Label stamp and then punched it out with the curly label punch. It is on dimensionals.

Thanks,


Tri Shutter Card

Splitcoast has a great challenge for this card, so I decided to give it a go and here is the result.
Here is the card completely opened. Because of the way the card is designed it is difficult to see the entire card in one view so I am including several more pictures to give you a better look from various points of view.

Here is the very front of the card. This has been put on dimensionals, I have added some flowers and die cut leaves, some ribbon and a Happy Birthday saying. I have also sponged the edges of my papers with chocolate chip ink.

Here is the card opened slightly. I stamped several butterflies from the Great Friends stamp set on whisper white with Baja Breeze ink ( going to miss this color) and then cut them out, added some gems and folder wings up slightly from card.

One angle of the middle section. This card has so much going on, but was fun to make and fun to look at when you are finished.

and here is another view of the middle section.

and here is the picture of the last section, I want to say page, but it is not a page. I definitely recommend giving this card a try, I am sure you will enjoy it.
Thanks,


Class Policy on Purchased Tutorials

Class Policy
MY POLICY ON TEACHING CLASSES WITH MY PURCHASED TUTORIALS:

You may teach classes ,in person, with my tutorials! However, please be aware of the fine print regarding that...

Feel free to teach any of my tutorials as classes where you are the instructor, in person. You can verbally instruct for classes but any forwarding, rewriting, video taping or handing out of my tutorials or instructions is prohibited. Projects made with my tutorials cannot be submitted for contests or publication as I reserve that right for myself.

Thanks,

Another GRAD book

For the GRAD book class we did whatever school colors were desired, depending upon where the student was graduating. Here is another of the color combinations. I love how this one turned out. When I was preping the pages, I was thinking that it was going to be not very nice, but after it was completed, I was in awe of how beautiful the colors worked together. I wish Stampin Up would sell Going Gray in a large pack by itself though and not in a multipack only. I have a difficult time acquiring enough of this color cardstock for this class.
I used various Designer Papers, in colors that matched the school colors.


Every book included the year of Graduation, and the school initials

And I tried to include lots of places for journaling. Everyone was very pleased with their finished books.
Thanks,


Friday, June 12, 2009

Variation on Trinket Box

This is a slight change to how I finished my trinket box from the tutorial found here.
I added a flower from the Pretties kit and another center Prima flower and then a gem brad. I also die cut some leaves and did pretty much everything else the same.


This is so fun to make. I already know several people who will be getting these as gifts, since after showing them the finished boxes they made it known they would like one.

and just a picture from another angle.
Thanks,

Thursday, June 4, 2009

One Cupcake at a Time!

Here is a quick card I made for my dad for his birthday. I thought I would show you how simple it is by giving you a quick tutorial for this card. Begin with the following supplies...
1-5" strip wide grosgrain chocolate chip ribbon
1- standard card base in Basic Gray
1- Close to cocoa matt embossed with Cuttlebug's Happy Birthday folder, I then sanded the text slightly
1-scallop oval in Basic Gray
1-SU wide oval in whisper white Stamped with image of the cupcake from Party Hearty in So Saffron and Bordering Blue
1- Stamped image of the cupcake from Party Hearty in So Saffron and Bordering Blue cut out and on dimensionals
Adhesive-I like Scor Pal tape as it holds well, but I also use my ATG gun as it is quick

Begin by adhering the embossed matt to the card base.

Next add the wide ribbon the the matt.

Ooops! See what I did. The ribbon needed to go on the matt before the matt was attached to the card base, so I had to lift it up and add more adhesive to make it stick good. Silly me!


Oh I also pre-sponged all the edges of my pieces for that aged look...anyone who knows me, knows I sponge almost every project I do. Here is what we have so far.


Next remove adhesive from large scallop oval.

Adhere scallop oval on the ribbon and to the right side of the card, it should look similar to the next picture


then remove adhesive backing from wide oval with cupcake image on it.


Adhere to center of Scallop oval.

Remove backing from dimensional on cut out cup cake pieces and place then over matching stamped cup cake pieces.


for the following dimensional look...


Stamp a saying on the inside and you're done!

Hope you enjoyed this quick tutorial and simple card.

Thanks,