
 There have been some cute Frankenstein boxes made out in the blogging/papercrafting world, so I thought I would make one too. Above is the finished box. Below is the tutorial. As always with lots of pictures. First cut out two Green Galore Top Note die cuts.
 I then cut two strip of black paper and cut the long edge on each with my MS punch. I did not have the grass punch or die so this was as close as I could get.
 I then run these through my Big Shot over the Top Note die to get a matching edge for the green pieces.
 I then cut half a round tab punch from the same green. This will become his nose.
 Then cut two more 3/4 pieces from black, these will become the bolts on the sides of his head.
I then made my box. The paper is 4 1/4 " x 8 1/2 ". Each side on the short end is scored 1" from the edge. Then rotate your paper.
 Then score 3 1/2" in from each edge on the long side.
 This is what your paper will look like all scored.
 Then using your fingers or a bone folder, crease/burnish all your score lines.
 Cut the four small middle lines, as shown below.
 Then apply adhesive to two of the longer edge pieces as shown in the picture below.
Remove adhesive backing and fold in edges so adhesive edge the last piece folded in.

Do this to both sides. Then set aside.
 Gather your Top Note cut outs, the hair cut outs, bolts punches, nose punch and also two 1" white circle punches, two 3/4" black circle punches, and one 1" green circle punch-cut in half. These will be used to create the face.
I then used a white gel pens to add a small white line to each black circle.

Apply adhesive to the back of the black pieces and attach to the white circle.

I then sponged the edges of the nose piece and the eyelids(half green circles) using black ink.

I also sponged the edges of the Top Note die cuts.

Apply adhesive to the hair strip and attach to the top short edge of one Top Note die cut.

Then apply adhesive to the nose piece and attach in the middle of the die cut.

Then apply the eyeballs just off center from the nose, mostly covering the top cut edge. Leave a small amount of space between the eyes.

Apply adhesive to the bolts ( this time to the front edge as it will be attached to the back of the die cut) and attach to the die cut just behind the center point. I think a little lower would work well too.


Add half a dimensional to the back of each eyelid piece and then attach to the upper part of the eye pieces.
 Frankie should look like this so far....but he needs a mouth!
I wanted to make my mouth be simple yet different from other peoples, so I cut out part of the curly label punch, using the longer side, on a scrap of paper. Then I traced it with a Stamp-n-Write marker (black).

I then added some lines at the end. So do you like his smile? You could add stitch lines along his mouth for a creepier Frankie, but I wanted to keep mine fairly friendly looking.
 Now apply adhesive to one side of you box and then attach Frankie's face.
Frankie will now look like this...but there is more...

Add the other piece of hair to the second Top Note die cut for the back of Frankie's head.

Then attach die cut to box as you did with the face piece.
 Frankie is almost done now.
 As a final touch I added some stitch lines to the back of his head.
So that his head looks like this in the back.
 I then added a couple to the face as well.
Now you could stop here, but I decide to add a handle. Punch a small hole on each of the side pieces of your box.

I then took a 14" piece of wire and wrapped in around a pencil.

I then inserted the ends in the small holes and bent the wire a bit to keep it from falling back out.
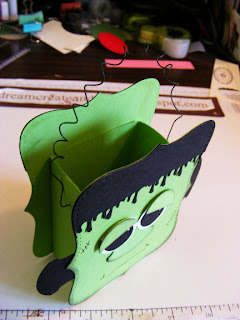 So there you have my version of Frankie. Hope you enjoyed my tutorial.

I think I will tyr some other characters, but not post the tutorials. I may give brief descriptions on how I made them but basically they will be similar to this method.
 So there you have my version of Frankie. Hope you enjoyed my tutorial.
I think I will tyr some other characters, but not post the tutorials. I may give brief descriptions on how I made them but basically they will be similar to this method.
Thanks,


13 comments:
Geez I wish we celebrated Halloween here in Australia Tammy. I would be making all these Halloween projects in a heartbeat. What an excellent Frankie you did. Congrats.
Regards
Michelle
Very, very cute!! Thanks for sharing!
These are so stinkin' cute! Thanks for sharing your tutorial!
Oh how cool! I love it Tammy ~ I'm gonna try this for sure. You don't mind do you? I'll link it back to your site.
You are such an amazing papercrafter, very inspiring too! I love Halloween and these are perfect!
Hugs,
Joani
This is a wonderful tutorial. When I make and post the box on my blog, I'll be sure to send my readers over to you. Thanks so much for sharing!
Great tutorial! I will make one and link to your site. TFS!
My 2 year old Grandson is going to be Frankie for Halloween. I'm soooo excited to make this box for him. Your tutorial was awesome, Thank you Pam
wowsers! Thanks for being so super detailed! I now know exactly how to do it thanks to you! ;)
Love your Frankie and other halloween tutorials. Thanks so much for sharing. I will be trying them for sure.
He's adorable and you're tutorial is very easy to follow. Thanks for sharing!
Great tutorial, only just seen it now, so too late for Halloween, but there's always next time :)
Thanks for sharing.
Alex from England x
How adorably delicious!!!!!!!!
I just want to say THANK YOU so very much for sharing your tutorial!! I've looked for HOURS to find the dimensions for the "box" part and so many crafters don't share without wanting to get paid for the tutorial.....so THANK YOU so much for sharing. God Bless You!!
Post a Comment