Friday, December 24, 2010

A Merry Christmas to You All!

It has been a great year in 2010. Many changes have taken place in my life, but they have all worked out for the best.


I wish everyone a Very Merry Christmas and A Happy New Year, may 2011 bring you all closer to your dreams.


Thank you all for your support and encouragement over the past year,


Thursday, December 2, 2010

Planner Video

Below is the video of the planner so you can see better all the little details on this project.


Thanks,


Wednesday, December 1, 2010

PaPer Cubed December Challenge

Here is my submission for Paper Cubed's December challenge. The challenge was to create some type of organizer for the holidays. This is what I came up with. I will post a video of it tomorrow.

Here is the inside. There are tabbed divided sections, and pockets for assorted items. The inside section is removable so when it is used up you can replace it and still use the cover.
I hope you enjoyed this fun planner
Thanks,


Wednesday, November 24, 2010

Group Photo

I was able to get a group picture of all the wonderful tags from the swap.
I normally reduce the file size so they images upload quickly but I left this one full size so you can click on it and see them with better detail.


Thanks,


Saturday, November 20, 2010

Image Tags Swap

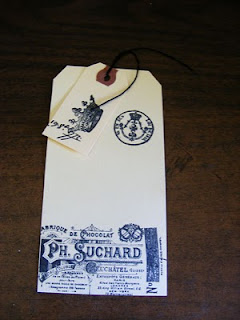
Stephanie hosts a image tag swap over at With a Grin. I was able to participate in her most recent one. I am just now getting around to posting the tags I made for the swap. The idea is to stamp two sets of ten tags each.

This is the first set I made. I really wasn't thinking clearly at all because this swap was for October and I really should have made mine with a Halloween theme...but oh well.

I added a smaller tag to each with another image stamped on it. Both images are Stampers Anonymous stamps....otherwise know as Tim Holtz stamps

Here is the second set of ten. Now I am not completely sure how her swap works but I thought I would get one back of each of my tags along with nine others for each group but I only got one of mine back and lots of other wonderful tags. Which is cool for me because then I get lots of fun tags.

The stamps for this tags were from Tim Holtz and 7Gypsies.

A close up of the smaller tag for the second set of tags. I hope you all enjoyed my tags as mush as I enjoyed all of yours. I will try to post pictures of the tags I received soon. I really miss my craft time since starting working outside the home, but sure appreciate the chances I do get.
Thanks,


Tuesday, November 16, 2010

Christmas Version of the Sunburst Mini

Here I have made another version of the Sunburst mini using the Deck the Halls Designer Series paper from Stampin Up.

For the cover trim I used my new Martha Stewart Holly and Berries punch to cut the Holly leaves. I then used a stylus to add a center groove and depth to the leaves. A Prima pointsettia completes the closure trim.

Here are the tags inserts. I used various embossing borders for the edges of each tag.

and here are the backs of the tags. I tried to include a journal spot on each along with some vintage styles stamped images. Stamped images are from Stampin Up and Tim Holtz.

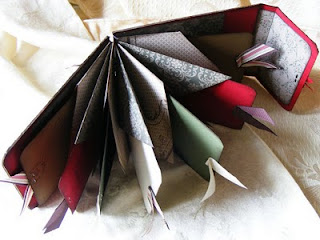
I just love the way this book looks open. Below is a video of the mini if you want to check it out as well.
Thanks,

Friday, October 29, 2010

Sunburst Mini for A Friend

I made this cute mini for a good friend for her birthday. I just love the paper, it is by Stampin Up and is called Love Letter.

I used a coil binding. The closure is a flap that folds over and is held in place by an elastic cord theat wraps around the mini.

When you open the book this is what you get! A lovely sunburst. Laura from Following the Paper Trail shows how to do this inside part here.

Here is the front side of the tags...oops there are only six showing but there are actually 7 tags in the mini.

and here is the back on six of the seven tags.

Just another view of the mini opened up.

Here is the whole thing with tags out.
This is a fairly quick project and lots of wow appeal.

If you are looking for a fast and fun mini, this might be the one. You can see my video for this mini below. I hope you enjoy.


Thanks,


Sunday, October 24, 2010

Flowers and More Flowers

Beautiful Flowers. So many flowers. I am no longer able to make my flowers for order. I am grateful to everyone who ordered these from me, but with my new job, I just don't get much craft time anymore. I miss it terribly and perhaps once my probationary period is over and I get an actual part time position, I will be able to have time to paper craft.

You can still make these on your own by watching my Ustream or Youtube videos showing how I make these beautiful flowers. I know they look difficult to make, but they are easy. You can use what you have, whatever punches or dies you have, each flower is unique. You can glimmer mist or use patterned paper, all of which makes each blossom a thing of beauty.

The large ones are my favorite. They remind me of magnolia blossoms. I once had a magnolia tree. It was a gift. I never did get to see it bloom because a neighbors dogs would pee on the tree every chance it got and killed it.
I was originally asked to be on the Paper Cubed Design team for 6 months but I received an e-mail stating I could stay on as long as I like. I will still be staying on. I know it will be a challenge to meet the monthly challenge but I feel it will keep me involved with paper crafting so I don't completely lose my favorite hobby.
Thanks,


Saturday, October 2, 2010

P3 Challenge Time!

It is Paper Cubed challenge time again. The challenge this month is to use acetate in your project. I made a treat holder. The base is made from a sizzix die called envelope, pocket. I then used a circle Nestability to make a window. To cover the window I used acetate that has been embossed with a web embossing folder. I then cut a matt for the window from some Stampin Up designer paper called Wickedly Fun Specialty. I wrapped a piece of Purely Pomegranate Satin ribbon around the flap before sealing the sides with adhesive. I die cut a spider and made a matted label for the pocket.

I then made a tag to attach to the top of the pocket. I used more Purely Pomegranate ribbon and tied it with a small piece of striped grosgrain in pumpkin pie. Both stamps are from Stampin Up.

You can check out the other Design Team projects or add your own here. You have a whole month to create something.

Thanks,


Wednesday, September 15, 2010

For A Special Friend

I was invited recently to an appreciation night for a good friend. We had to make a tag, card or postcard with a comment on it about why we appreciated this special person. This is the card I made for her. I also had to include a ribbon/fiber on it that represented her favorite color...which I got wrong! This fiber has brown and blue on it, my idea was blue. BUT... I now know her favorite color, burgundy.

I know it is not very feminine but I knew she would know it was from me because it is my style. I included a key because she knows the key to being a good friend and a "friend" charm, well because she is one of mine.

The lock is because she knows how to unlock my heart and allows me to be me. She always accepts me no matter what. She is supportive and always happy for me when I am happy and comforts me when sad. Inside there was a special message just for her. I went to my mailbox today and you know what, I got a special card from her expressing her appreciation for me. She is just like that.
Love you my special friend...

Thanks,


Tuesday, September 14, 2010

Some Creative Ideas

I did not have a picture of my Halloween Ephemera Bingo cards to show you when I made the post for them the other day. I finally got some printed off and even better than that I altered them so you can see how fun they are to work with. Above I stamped in clear embossing power a skull. Then Glimmer misted the card with Raven.I rubbed the excess off of the skull then used a dauber to mark several numbers on the card. The word letters were then covered with crackle accents, which somewhat turned black from the Glimmer mist. Of course the edges were sponged with black.


I used an embossing folder on this one to added the cracked effect. I then embossed and die cut two bats and adhered them to the card. I added some bling for the bat's eyes. The final touch was some sponging to add that aged look.


My third and final sample for the day is also embossed using a spider web. I used stickles in black for the letters and the spiders web line. The spider is embossed and die cut from the same folder used to make the bats. I added some stickles to the body of the spider. I then added a gem flourish to the lower corner. and sponged the edges and a bit over the raised part of the embossed web.
I have added another set as well, the new words are SKULL, BONES, TREAT and GHOUL

You can get my Halloween Bingo Card here.
I hope you enjoyed these fun ideas.

Thanks,


Thursday, September 9, 2010

I'm Still Here...

I'm just still making some huge adjustments in my life. Legal stuff with my separation, applying to go back to school and looking for work, all the while babysitting my grandson and raising my two youngest children...now for some of you this is a breeze but for me it is challenging so, stay tuned...I will get regular with posting again as soon as possible.


I would like to thank those of you who have expressed care and concern for my " missing in action " presence.


Huggs to you all,


Wednesday, September 1, 2010

P3 Time Again

The Challenge at Paper Cubed for this month is to create a bookmark. This is a very simply but effective bookmark. I layered two die cut tags from the Two Tags die from Stampin Up together. The top piece is cut, using a exacto blade, around the perforation to make that piece seperate. It is the part that slips over your page. I added the crimping on the bottom as a decorative touch. These ones are Christmas themed but this tag is so versatile you can turn it into any theme.

This is how it fits over your page. Fun, fast and effective....Fabulous!
Thanks,